Recent day I was completed the basic information about Photoshop Toolsbar. Hope it will help you very much to the beginners. Now the next part, it is Photoshop Palettes.
Palettes are essential components of your tools set. For one, palettes help you define the nature of your tools. That is, palettes help you customize how the tools in the toolbox perform. For example, you might "sharpen" (make the line thin) or "dull" (make the line thick) your pencil tool using the "Brushes Palette". Palettes also help you perform some of the more complex tasks such as layering or manipulating complex color schemes. Photoshop has many attractive palettes for different kinds of work. These palettes are updated by its version.
Now here, I will share the use about some important palettes. I thing, I am not a Photoshop expert; I will just sharing the matter what I know. Let’s go....
Navigator Palette:
Navigator Palette is being using for showing or seeing the document or image at the real place of a document, I mean if you was maximized the current image to its real size then you can not seeing the whole image into the current screen. So that you need to use the Navigator Palette to get the point of image that you want to see. To utilize this palette properly, just mouse over the palette image area (for this you need to maximize the current image), then a hand symbol will be coming, now, you need to drugging then image by continuously clicking the mouse left button. Here you get the use of this palette.
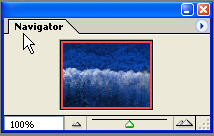
To change the navigator image selection border color manually, just go to the section selected below, then click Palette Options... and change the color, finally ok.

Info Palette:
In Photoshop, Info Palette role is very important to showing the requested information about color code value (RGB or CMYK), measuring unit value (Inches, Pixel, Point, Picas etc.) and size of an image (Width and Height). It shows these elements information clearly in front of the palette area. It also shows the color value of a selected area an image.

To change the Info Palette information manually, just go to the section selected below, then click Palette Options... and change the option(s), finally ok.

Histogram Palette:
The Histogram palette offers many options for viewing tonal and color information about an image. By default, the histogram displays the tonal range of the entire image. To display histogram data for a portion of the image, first select that portion. By default, the Histogram palette opens in Compact View with no controls or statistics.

To change or showing the Histogram Palette information manually, just open an image, then click or drug on the image. The Histogram Palette shows the requested information in the palette area.

Style Palette:
One of the most important palettes for designers. Even the experience designer can creates a style by his own imagination, but the beginners can make good jobs by style palette. It has many styles to use. Additional plugging can be use for attractive works.

To change the view of this palette style, go to the options. By this options you can reset, save, load new style from HDD.

Swatches Palette:
Swatches Palette is also an important part of Photoshop. It shows different types of color separately. Background & Foreground color can also be change from it. Just select the Background or Foreground color box from toolsbar, and then click to requested color from the Swatches. You can create new Swatches and delete the old Swatches from Swatches palette.

Many extra ordinary and HD colors are available in Swatches option. To use this, jump in the option & chose you color.

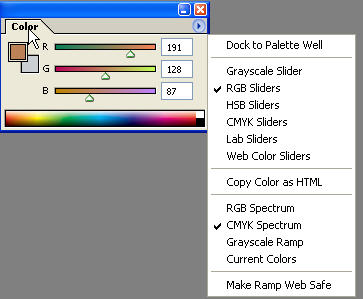
Color Palette:
A little use as Swatches Palette. The different is color palette shows it RGB or CMYK color code side of the color sliders but on the other hand, Swatches does not show it. It shows the code of code in the Info Palette. Try to prove it own.....

Other color Sliders and option can be change to options area. Chose it own.
History Palette:
History Palette shows the history of an image, when you was opened an image for editing; likes cut, paste, inserting custom shapes, changing body color etc. It shows all these editing history in the palette window separately. You can go to the previous history by just click the editing point.

Option can be use for making snapshot, delete or clear all history of the image just edit before.

Action Palette:
Action Palette is use for editing of an image automatically by the auto command of different kinds of Action. Here you can set command for cutting or coping an image area, then paste into a new document. Resizing the image size Passport size to Stamp size or 3R to Passport size. This whole process will arrange automatically by Action Platte. This whole process of creating or utilizing Action will be shown by a tutorial soon.

To control, create or editing new Action, go to option set your requirements for each of new or editable Action.
 hmm, here is the end of the introducing of Photoshop Toolsbar tutorials. Have you any question or fault by me, please feel free to ask me........
Hope you all enjoy the whole tutorials on Photoshop Tutorials.........

Hope you all enjoy the whole tutorials on Photoshop Tutorials.........
